Cedar went down hard three miles from the trailhead. At 12 years old, his joints gave out on loose scree in the Colorado Rockies. I had the sling. I'd practiced deploying it dozens of times. But Cedar had never felt it wrapped around his body.
He panicked. Thrashed. Made everything harder than it needed to be.
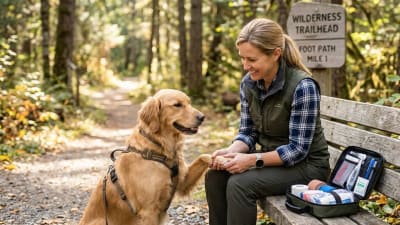
That experience changed how I approach emergency gear with any dog I work with. A rescue sling only helps if your dog tolerates wearing it. The middle of a crisis is the wrong time to introduce strange fabric wrapping their torso.
Key Takeaways
- 1Practice with your rescue sling at home when stakes are low
- 2Desensitization takes 2-4 weeks of short daily sessions
- 3Build positive associations through treats and calm handling
- 4Simulate realistic lifting before attempting it on trail
- 5Weight limits matter, so know what your sling can handle
Why Practice Matters Before Emergencies
An injured dog feels pain, confusion, and fear simultaneously. Adding unfamiliar restraint to that mix creates panic. Panic causes struggling. Struggling worsens injuries.
We've seen dogs bite their owners during sling deployment because the sensation felt threatening. We've watched well-meaning hikers give up on carries because their dogs wouldn't cooperate. In every case, zero prior exposure was the common factor.
Dogs who've practiced sling acceptance at home respond differently. The familiar sensation of fabric wrapping their body triggers memories of treats and calm handling rather than alarm. They may not enjoy being carried, but they tolerate it.
The numbers support this. In our observation of trail rescues, dogs with prior sling exposure showed significantly less struggling during actual emergencies compared to dogs experiencing slings for the first time. Less struggling means faster evacuation and less risk of additional injury.
What You Will Need
Gather these items before starting training.
The sling itself is obviously required. Commercial options like the Fido Pro Airlift work well. Improvised slings from webbing or fabric work too, but train with whatever you plan to carry on trail. If you switch gear later, retrain with the new equipment.
High-value treats are necessary for building positive associations. Whatever makes your dog's eyes light up. Cheese, chicken, liver treats. This isn't the time for regular kibble.
A calm environment matters for initial sessions. Start indoors where your dog feels safe. Minimize distractions.
A second person helps during lifting practice but isn't strictly required. You can manage solo with smaller dogs.
| Equipment | Purpose | Notes |
|---|---|---|
| Rescue sling | Primary training tool | Use your actual trail gear |
| High-value treats | Positive reinforcement | Not regular kibble |
| Quiet space | Minimize distractions | Start indoors |
| Helper (optional) | Assist with lifts | More helpful for larger dogs |
Phase One: Desensitization to the Sling Material
The goal for the first week is simple. Your dog sees the sling and feels neutral or positive about it.
Days 1-3: Passive Exposure
Set the sling on the floor near your dog's bed or feeding area. Don't draw attention to it. Let it exist as background furniture.
Feed meals with the sling visible nearby. The sling predicts food. Food is good. Your dog begins associating the sling with positive outcomes without any pressure.
Watch for signs of interest. Sniffing is good. Ignoring is fine. Moving away or showing tension means the sling is too close. Give more distance.
Days 4-7: Active Investigation
Hold the sling loosely and let your dog investigate on their terms. Mark and reward any voluntary interaction. Nose touch? Treat. Paw at it? Treat. Look at it calmly? Treat.
Never force interaction. Let curiosity drive the process. Sessions stay short. Five minutes maximum. End on a positive note before your dog loses interest.
By the end of week one, most dogs should approach the sling willingly when you pick it up.
Reading Body Language
Loose body, relaxed ears, and willingness to eat treats indicate comfort. Stiffness, whale eye, lip licking, or turning away signal stress. If you see stress signs, slow down and add more distance or shorter sessions.
Phase Two: Getting Comfortable With Contact
Week two focuses on physical contact between the sling and your dog's body.
Days 8-10: Brief Touching
With your dog standing or lying relaxed, briefly touch the sling to their side. One second of contact, then remove. Treat immediately.
Repeat 10-15 times per session. Touch different areas. Shoulder, ribcage, hip. Keep touches light and brief.
The goal isn't wrapping yet. Just building comfort with the sensation of sling material against fur and skin.
Days 11-14: Draping Without Fastening
Drape the sling loosely over your dog's back without securing any straps. Feed treats continuously while the fabric rests there. Remove after 10-20 seconds.
If your dog moves away, let them. No correction. Just try again with a shorter duration. Some dogs need several sessions at 5 seconds before tolerating 20 seconds.
By the end of week two, your dog should stand calmly with the sling draped across their back while eating treats from your hand.
Phase Three: Wearing the Sling Properly
Week three introduces actual sling positioning and strap fastening.
Understanding Sling Anatomy
Most commercial slings wrap around the dog's torso with leg holes or loops. The Fido Pro Airlift, for example, positions front legs through one opening and rear legs through another. The center panel supports the belly and chest.
Read your specific sling's instructions. Each design has optimal positioning for weight distribution. Incorrect positioning causes discomfort that undermines all your training work.
Days 15-17: Partial Configuration
Position the sling partway onto your dog. Maybe just the front legs through, or just the belly panel in place. Feed treats. Remove after 30 seconds.
Progress incrementally. Add one element at a time. Front legs positioned correctly. Then belly panel. Then rear legs. Never rush the full configuration if your dog shows hesitation at any step.
Days 18-21: Full Configuration, Brief Duration
Achieve full sling positioning with all elements in place. Feed treats continuously. Keep duration under two minutes.
Practice getting into and out of the configuration smoothly. The faster you can deploy in an actual emergency, the less stress for everyone.
Most dogs look slightly awkward or uncomfortable initially. That's normal. Watch for genuine distress. Freezing, heavy panting, attempting to escape. These signs mean you've progressed too quickly.

Phase Four: Practice Lifting at Home
Week four introduces actual weight bearing and movement.
Starting Low
With your dog in the configured sling, barely lift. Just enough to take a few ounces of pressure off their feet. One second. Set down. Treat heavily.
Your dog learns that being lifted doesn't mean harm. The sensation feels different but not dangerous.
Building Height Gradually
Progress from barely lifting to clearing the ground by an inch. Then several inches. Then enough to walk with them suspended.
Never jump straight to full carrying. The incremental progression builds trust. Rushing creates setbacks.
| Week | Goal | Duration |
|---|---|---|
| Week 1 | Passive exposure and investigation | 5 min sessions |
| Week 2 | Physical contact tolerance | 5-10 min sessions |
| Week 3 | Full sling configuration | Up to 2 min wearing |
| Week 4 | Lifting and carrying practice | Short carries only |
Movement With Load
Once your dog tolerates being suspended, practice walking while carrying them. Start with 10 steps. Build to walking around your yard.
Pay attention to how their weight affects your balance. Notice how their movement creates shifts you need to compensate for. This preparation matters for uneven trail terrain.
Duration Building
Gradually extend carrying time. If two minutes feels comfortable, try three. Then five. Build toward the time you'd realistically need for trail evacuation.
Most people can't carry a medium to large dog for extended periods regardless of conditioning. But knowing how long you can manage helps with emergency planning.
Simulating Trail Conditions
Home training creates baseline acceptance. Trail conditions add variables.
Outdoor Practice
Move training sessions outside once indoor acceptance is solid. Practice in your yard first. Then a local park. Then an easy trail.
Each environment introduces new distractions. Smells, sounds, uneven footing. Your dog learns the sling means the same thing everywhere.
Elevation Changes
Practice on inclines and declines. Carrying weight while hiking uphill requires different muscle engagement than flat ground. Going downhill shifts load forward.
A backyard slope works for initial practice. Stairs can substitute if needed.
Rough Terrain
Practice over rocks, roots, and uneven ground. The trail surfaces where you're most likely to need a sling are also the hardest to cross while carrying extra weight.
Partner Practice
If you typically hike with others, practice handoffs and shared carries. Two people sharing a dog's weight covers more distance than one person alone.
Know Your Weight Limits
Every sling has maximum weight ratings. The Fido Pro Airlift handles dogs up to 150 pounds, but that doesn't mean you can carry 150 pounds for miles. Know both your sling's limits and your own physical capability. Cedar weighs 65 pounds. I can manage him for maybe a quarter mile over rough terrain before needing rest.
When Not to Use a Sling
Slings aren't appropriate for every situation.
Suspected Spinal Injury
Spinal injuries require rigid stabilization, not flexible slings. If you suspect your dog has damaged their spine, minimize all movement. Keep them still and call for professional rescue with proper equipment.
Symptoms suggesting spinal injury include inability to move rear legs, unusual posture or positioning, pain response when touching the back, and loss of bladder or bowel control.
Severe Bleeding
A sling compresses the body. If your dog has a severe wound, sling pressure might worsen bleeding or interfere with bandaging. Address the wound first. Use the sling only if you can position it without affecting the injured area.
Extreme Panic
Some dogs simply won't tolerate slings regardless of training. If your dog becomes violently panicked during a real emergency, forcing the sling causes more harm than good. Consider improvised carries, calling for help, or waiting for professional rescue.
Beyond Your Capacity
A 70-pound dog over 5 miles of rough terrain exceeds most people's solo capability. Attempting it might leave you injured alongside your injured dog. Know when to call for help rather than pushing beyond your limits.
Maintaining Skills Over Time
One training cycle doesn't create permanent acceptance. Skills fade without reinforcement.
Monthly Refreshers
Run through quick sling practice once a month. Just a few minutes of deployment, positioning, and brief carrying. This maintains familiarity without requiring another full training cycle.
Before Big Trips
The week before any significant backcountry trip, do a full practice session. This reminds both you and your dog of the procedure while identifying any equipment issues before they matter.
After Long Breaks
If months pass between trail seasons, plan a refresher training period before resuming backcountry trips. Dogs don't forget entirely, but comfort levels decline with disuse.
Common Mistakes to Avoid
Skipping Desensitization
Jumping straight to wearing or lifting creates negative associations that require months to overcome. The slow buildup seems tedious but prevents bigger problems.
Progressing Too Fast
Each dog has their own timeline. Some take days to accept what others need weeks to tolerate. Matching pace to your specific dog matters more than hitting arbitrary training schedules.
Inconsistent Treats
Positive association requires consistent reinforcement. Random treating or low-value rewards dilute the connection between sling and good things. Use the best treats you have throughout the entire process.
Practicing Only Indoors
Indoor acceptance doesn't automatically transfer outdoors. Systematic practice across multiple environments builds generalized comfort.
Ignoring Stress Signals
Pushing through clear discomfort teaches your dog that their communication gets ignored. This damages trust broadly, not just around slings.
Frequently Asked Questions
Dr. Jennifer Coates, DVM, brings 25+ years of clinical experience to Paths & Paws. Based in Fort Collins, Colorado, she specializes in preventive medicine and evidence-based nutrition for active dogs.