
Your dog can carry their own water and snacks on trail. But strapping a pack onto an unprepared dog creates stress and resistance that's hard to undo. Proper introduction takes time. The investment pays off with a dog who wears their pack happily for years.
I've introduced packs to dozens of dogs over the years. Here's the progression that works.
Key Takeaways
- 1Allow 2-4 weeks for proper introduction before hitting trails
- 2Build positive associations before adding weight
- 3Increase duration and weight separately, never both at once
- 4Watch for signs of discomfort throughout the process
Before You Start
Age Requirements
Dogs should be fully grown before carrying loaded packs. For most breeds, this means 18-24 months old. Large breeds need longer because growth plates close later.
Puppies can wear empty packs for desensitization, but no weight until growth is complete. When in doubt, ask your vet.
Physical Fitness
Pack carrying requires conditioning. A dog who only walks around the block isn't ready for a loaded pack on a 10-mile hike. Build baseline fitness first through regular hiking without gear.
Health Check
Joint issues, back problems, and certain conditions make pack carrying inadvisable. Check with your vet before starting pack training if your dog has any health concerns.
Proper Fit
An ill-fitting pack makes training harder. The pack should sit behind the shoulders, not on top of them. Weight should rest on the ribcage, not the spine. All straps should be snug but allow two fingers underneath.
If the pack doesn't fit well, training won't overcome the physical discomfort.
Week One: Introduction
The goal for week one is simple: your dog sees the pack and feels happy.
Day 1-2: Pack Presence
Set the empty pack on the floor near your dog's food bowl. Let them investigate. Don't draw attention to it. Just let it exist in their space.
Feed meals near the pack. The pack predicts food. Food is good. The pack becomes associated with good things.
Day 3-4: Pack Interaction
Hold the pack and let your dog sniff it. Mark and reward any interaction. If they touch it with their nose, treat. If they show curiosity, treat. Never force interaction.
Short sessions only. Five minutes maximum. End before your dog loses interest.
Day 5-7: Pack Touching
Briefly touch the pack to your dog's side while feeding treats. Touch, treat. Touch, treat. Keep contact light and brief.
Work toward being able to rest the pack against their side while they eat treats from your hand. No straps yet. Just physical contact with the pack.
Go Slower If Needed
If your dog shows any hesitation at any step, back up. Spend more time at the previous stage. Rushing creates setbacks that cost more time than patience does.
Week Two: Wearing Empty
The goal for week two is wearing the empty pack comfortably indoors.
Day 8-10: Loose Draping
Drape the pack over your dog's back without fastening straps. Feed high-value treats continuously while the pack rests there. Remove after 10-20 seconds.
Repeat several times per session. Sessions stay short: five minutes maximum.
If your dog freezes, stiffens, or tries to move away, you're going too fast. Return to week one exercises.
Day 11-12: One Strap
Fasten just the chest strap, loosely. Continue feeding treats. Keep the pack on for 30-60 seconds before removing.
Watch body language. Relaxed posture and willingness to eat treats indicate comfort. Any stress signs mean you need more time at the previous step.
Day 13-14: Full Harness, Empty
Fasten all straps loosely. Feed treats. Keep sessions under two minutes.
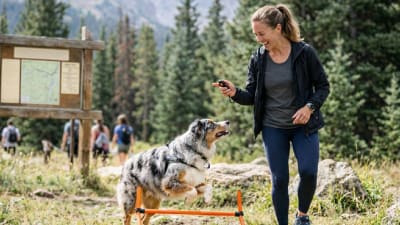
Once your dog stands relaxed in the fully fastened empty pack, begin asking for simple behaviors: sit, down, touch. Reward each one. This normalizes wearing the pack during activity.
Week Three: Movement and Duration
The goal for week three is comfortable movement while wearing the empty pack.
Day 15-17: Indoor Walking
With the empty pack on, walk around your house. Use treats to keep it positive. Start with 2-3 minutes and build to 10 minutes.
Most dogs act slightly different at first. They might walk stiffly or look at the pack. This usually resolves quickly when movement becomes routine.
Day 18-19: Outdoor Walking
Move to your yard or a familiar quiet area. Same process: short walks with lots of rewards. Build from 5 minutes toward 20 minutes.
Watch how the pack moves as your dog walks. If it shifts or bounces, adjust the fit. The pack should stay centered and stable.
Day 20-21: Adding Light Weight
Add minimal weight: maybe half a pound total. Use soft items that conform to the pack shape. Dog treats work well because they're lightweight and useful.
Walk for 10 minutes indoors. If your dog seems unbothered, walk 15-20 minutes outdoors. Always remove the pack immediately if you see discomfort.
Weight Limits
Dogs should carry no more than 10-25% of their body weight, depending on conditioning. Start at 5% and build gradually. A 50-pound dog should carry no more than 5-12 pounds total, and only after full conditioning.
Week Four: Building Capacity
The goal for week four is gradually increasing weight and duration toward trail-ready levels.
Increasing Weight
Add weight in small increments. If your dog carried 1 pound comfortably, try 1.5 pounds next session. Never double the weight in a single session.
Balance weight evenly between sides. An uneven load causes discomfort and can strain muscles.
Increasing Duration
Separately from weight increases, build duration. If your dog handles 20 minutes at current weight, push toward 30 minutes. Don't add weight and duration in the same session.
First Trail Test
Once your dog handles target weight for 30+ minutes on neighborhood walks, test on an easy trail. Choose a short, familiar route. Monitor closely for any signs of discomfort.
The first real hike with a pack should be half your normal distance. Your dog needs to build trail-specific conditioning while carrying weight.

Signs of Discomfort
Watch for these throughout training.
Stop immediately if your dog refuses to walk, lies down and won't get up, yelps or whines, attempts to bite at the pack, or shows unusual limping or changes in gait.
Slow down if you notice frequent pausing, reluctance to move at normal pace, your dog repeatedly looking back at the pack, or excessive panting beyond what exertion would explain.
Any concerning signs mean you've progressed too fast. Reduce weight, reduce duration, or return to earlier training stages.
Common Mistakes
Going Too Fast
The most common mistake is rushing. Owners want their dog ready for next weekend's hike. The dog develops negative associations that take months to overcome.
Two to four weeks of proper introduction saves years of fighting with a pack-resistant dog.
Adding Weight Too Quickly
Every increment feels small, but they compound. Going from 2 pounds to 4 pounds is doubling the load. Smaller jumps with longer adjustment periods build true capacity.
Ignoring Fit Issues
Dogs can't tell you the pack is rubbing or pinching. They just become uncomfortable and reluctant. Check fit regularly as you progress through training.
Training Only at Home
Home-trained dogs sometimes refuse to wear packs elsewhere. Practice in multiple environments: different rooms, the yard, neighborhood walks, parks. Generalize the acceptance.
Skipping Maintenance
Even trained dogs benefit from occasional reinforcement. If your dog hasn't worn their pack in months, don't expect the same performance. A quick reintroduction prevents problems.
Long-Term Pack Care
Once trained, maintain your dog's comfort through consistent attention. Before each hike, verify fit. Weight changes, thick winter coats, and strap stretch all affect how the pack sits.
During the hike itself, monitor for shifting, chafing, or any signs of discomfort. Stop to adjust as needed. After you finish, check for rub marks or irritation, clean the pack, and inspect it for wear.
Store the pack properly during off-seasons. When you return to the trail after a long break, reintroduce weight gradually rather than jumping straight back to previous loads.
Frequently Asked Questions
Sarah is a certified canine fitness trainer with a background in veterinary rehabilitation. She focuses on injury prevention, proper conditioning, and training techniques for trail dogs.