
Paw pads are tough. They handle miles of rocks, roots, and rough terrain. But they are not indestructible. Sharp rocks slice them open. Hot pavement burns them. Ice and snow crack them. When a pad tears mid-hike, you need to act fast.
Quick Steps
- 1Stop and assess the injury severity
- 2Apply direct pressure to stop bleeding
- 3Clean the wound with water
- 4Bandage with non-stick pad and wrap
- 5Protect bandage for the hike back
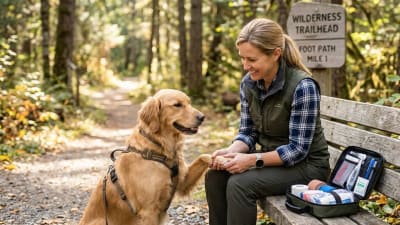
We have dealt with paw injuries three miles from the trailhead with nothing but a basic first aid kit. It is not fun, but it is manageable if you know the steps. This guide covers what to do when your dog's paw starts bleeding on the trail.
Know When to Get Help
This guide covers basic field treatment. Deep lacerations, burns, puncture wounds, or injuries that won't stop bleeding need veterinary care as soon as possible.
Recognizing the injury
Dogs hide pain well. You might not notice a torn pad until you see blood on the rocks or your dog starts limping. Check paws regularly on rough terrain. Catching a small tear early prevents it from becoming a big problem.
Signs of a paw pad injury include sudden limping, licking at the paw, reluctance to walk, or visible blood. Stop hiking immediately when you notice any of these.
Examine the paw carefully. Look for cuts, punctures, flaps of torn skin, or embedded objects like glass or thorns. Note how deep the injury goes. Surface scrapes look scary but heal fast. Deep cuts that expose tissue underneath need professional attention.
The location matters too. Injuries on the main weight-bearing pad affect mobility more than cuts on the smaller digital pads. Injuries between the toes can hide debris and get infected easily.
Stop the bleeding
Paw pads bleed a lot. The tissue is highly vascular, so even minor cuts produce alarming amounts of blood. Do not panic. Most bleeding looks worse than it is.
Apply direct pressure with a clean cloth, gauze, or even a spare sock. Hold firm pressure for at least five minutes without peeking. Lifting the cloth to check interrupts clot formation and restarts the bleeding.
If blood soaks through, add more material on top. Do not remove the first layer. Keep adding and keep pressing.
Pro Tip
Styptic powder stops bleeding fast, but cornstarch works in a pinch. Pack either into the wound and apply pressure. Always carry styptic powder in your trail first aid kit.
For stubborn bleeding, you can apply styptic powder if you carry it. Cornstarch works in a pinch. Pack the powder into the wound and apply pressure again.
Elevating the paw above the heart helps slow bleeding. Have your dog lie down and prop the injured paw on your pack or leg while you apply pressure.
Clean the wound
Once bleeding stops, you need to clean the wound to prevent infection. This part is not comfortable for your dog. Work calmly and talk to them throughout.
Flush the wound with clean water. Your drinking water works fine. Squeeze water directly into the cut to wash out dirt, grit, and debris. Do not scrub. Scrubbing damages tissue and restarts bleeding.
If you see embedded objects like glass, thorns, or gravel, remove them with tweezers if you can do so without causing more damage. Deeply embedded objects should be left for a vet.
After flushing, pat the area dry with clean gauze. Inspect the wound again now that it is clean. You can better assess the severity without blood and dirt obscuring things.
Apply a thin layer of antibiotic ointment if you have it. Plain triple antibiotic works well. Avoid anything with pain relievers like benzocaine, which can be toxic if your dog licks it.
Bandage it
A good field bandage protects the wound and lets your dog walk back to the trailhead. This takes practice, so learn the technique before you need it.
Start with a non-stick pad directly over the wound. Gauze stuck to a wound will rip it open when you remove it later. Non-stick pads are worth carrying.
Wrap gauze around the paw to hold the pad in place. Go between the toes and around the ankle in a figure-eight pattern. Snug but not tight. You should be able to slip a finger under the wrap.
Cover the gauze with self-adhesive bandage wrap. This sticks to itself but not to fur. Wrap in the same figure-eight pattern. Extend the wrap above the ankle to keep the whole thing from sliding off.
Finally, protect the bandage from the trail. A spare sock works great. Dog boots work even better if you have them. Duct tape over the bottom of a sock adds durability for the hike out.
Check the bandage every fifteen minutes. Swelling that tightens the wrap cuts off circulation. Looseness that lets the bandage slip exposes the wound to dirt.

Getting back to the trailhead
Your dog needs to walk out unless you can carry them. Adjust your pace and route to minimize further injury.
Take the shortest path back, even if it is not your planned loop. Now is not the time for peak bagging.
Avoid rough terrain if possible. Choose dirt over rocks. Choose flat over steep. Every step on a bandaged paw risks reopening the wound.
Let your dog set the pace. They will slow down when they need to. Frequent breaks help. Check the bandage at each stop.
If the bleeding restarts or your dog refuses to walk, you may need to carry them. For small dogs, this is doable. For large dogs, look up emergency dog carries before you need one. A makeshift stretcher from trekking poles and a jacket can work for short distances.
Watch for signs of shock on the way out. Rapid breathing, pale gums, weakness, or confusion all indicate your dog needs emergency veterinary care.
When to see a vet
Some injuries need more than field treatment. Get to a vet as soon as possible if you see any of these signs.
Go immediately for:
- Bleeding that won't stop after 15 minutes of pressure
- Deep cuts that expose fat, muscle, or bone
- Puncture wounds, which trap bacteria inside
- Burns from hot pavement or chemicals
- Signs of shock
See a vet within 24 hours for:
- Any cut that needed field bandaging
- Injuries with embedded debris you couldn't remove
- Paw injuries combined with limping that persists
- Signs of infection like swelling, heat, discharge, or foul smell
Monitor at home:
- Surface scrapes that stopped bleeding quickly
- Minor cracks from dry conditions
- Small tears that your dog isn't bothering
Even minor injuries warrant a call to your vet. They can advise whether you need to come in or what to watch for at home.
Prevention
Treating paw injuries is doable. Preventing them is better.
Build up pad toughness gradually. Dogs who spend most of their time on carpet have soft pads. Start with short walks on varied terrain and increase distance slowly over weeks.
Check trail conditions before you go. Rocky volcanic terrain, hot sand, and icy trails all pose higher risks. Adjust your plans or bring boots.
Dog boots protect against the worst terrain. Many dogs resist them at first. Practice at home until they walk normally in boots before you need them on the trail.
Paw wax adds a protective layer without the hassle of boots. Apply it before hikes on rough or hot terrain. It wears off and needs reapplication on longer outings.
Inspect paws during rest breaks. Catching a small cut or embedded pebble early prevents a big problem later.
Frequently Asked Questions
Paw injuries happen to every trail dog eventually. The difference between a minor inconvenience and a major emergency often comes down to preparation. Carry a basic first aid kit, know how to use it, and check those paws before small problems become big ones.
Dr. Jennifer Coates, DVM, brings 25+ years of clinical experience to Paths & Paws. Based in Fort Collins, Colorado, she specializes in preventive medicine and evidence-based nutrition for active dogs.
References & Further Reading
- Paw Pad Injuries in Dogs — VCA Animal Hospitals
- First Aid for Dogs — American Kennel Club